RACHEL JOHNSON ART
WILDLIFE & PET PORTRAIT ARTIST
PHOTO GUIDE
Taking a photo of your pet can be tricky, but the quality of the reference photo provided is so important to the outcome. Here is a guide to ensure your portrait will be as true to your pet as possible.
1. think about the kind of pose you would like your pet to be represented in, i.e. sitting down, laying on their favourite blanket/on your bed, looking to the side, looking to the front.
2. Use a camera with a good quality dpi, like an iphone or digital camera.
3. Take in the most natural light you can and not directly into the light as this can cast shadows on features making it difficult to distinguish the markings.
4. be as close as you can to your pet, but not so that he/she is blurry as this makes it difficult to see the direction of the fur and individual markings
5. send photos that show your pet in the most accurate colour/tone, as certain lights can really enhance or darken colours in nthe fur, and make them look more vivid and exaggerated which may not be the desired outcome.
6. The artist will advise on photos at the time and may request a few more to ensure consistency and accuracy. Please look at the photos below and see the examples of good and bad photos.
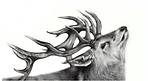
EXAMPLES OF BAD PHOTOS


The above photos, in terms of photos may look quite nice and striking, but the two end photos are so dark that the shape of the full ear and face profile cannot be fully seen. the middle photo shows much of the animal in soft focus, which may look attractive, but this makes it impossible to pick out fur direction, texture and individual markings on the animal.
EXAMPLES OF GOOD PHOTOS


The above photos are much better in terms of being able to pick out individual features, textures and true tones in the fur of the animals. You can also see the features like the nose and eyes very clearly without blurriness.
If you would like more advice on your photos, please contact me here or via the 'contact' page.